How to Setup End-to-End CI/CD for a Flutter App with GitHub Actions
9.3 min read
By: Naresh Kumar M R

Flutter, Google’s popular open-source framework, empowers developers to craft natively compiled applications across a multitude of platforms. Since its launch in 2017, Flutter has surged in popularity thanks to its rapid development cycle, captivating user interfaces, and impressive performance. By harnessing the Dart programming language and leveraging an extensive library of pre-designed widgets, developers can create stunning, responsive, and lightning-fast user interfaces that function seamlessly on iOS, Android, the web, and desktop environments.
For solo developers and larger teams alike, mastering Continuous Integration/Continuous Deployment (CI/CD) can significantly enhance your Flutter projects. In this blog post, we’ll delve into how Flutter developers can harness the power of GitHub Actions to automate their app’s entire lifecycle—from code commits to deployment—making the process smoother and more efficient.
GitHub Workflows and Triggers
A workflow is a highly customizable process that executes one or more jobs. These workflows are defined within a YAML file, stored alongside the original code in the same repository. Typically, YAML workflows are triggered by specific events or conditions specified in the file, but they also offer the flexibility for manual execution whenever needed.
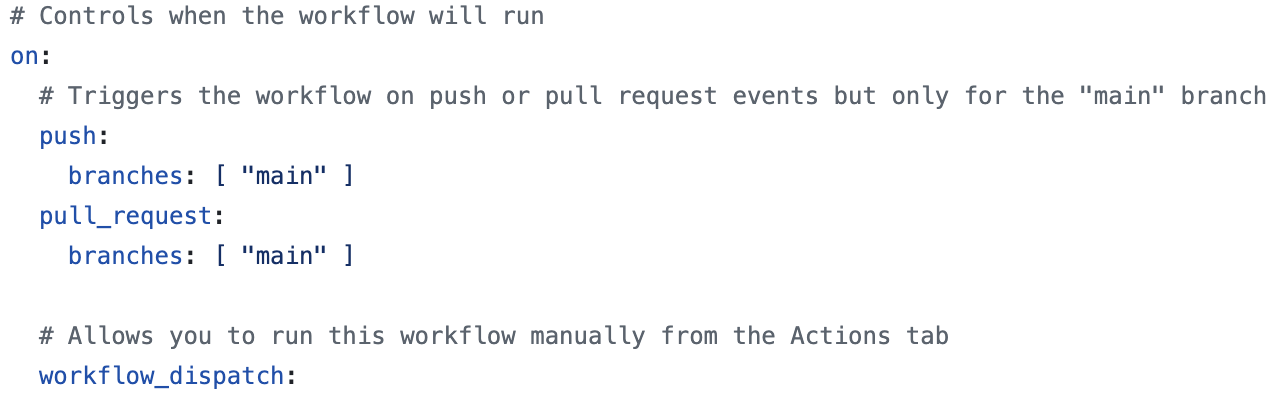
In this example, we establish triggers designed to enhance our workflow efficiency:
- When a push occurs to the main branch
- When a pull request is submitted against the main branch
- The ‘workflow dispatch’ option allows this workflow to be executed manually from the actions tab in the repository whenever required.
Moreover, triggers can be configured to execute the entire workflow, proving invaluable for managing multiple environments within our development lifecycle—a topic we will explore further in this article.
Setting Up Code and Flutter Environment
The first part includes setting up the code base and choosing a runner.
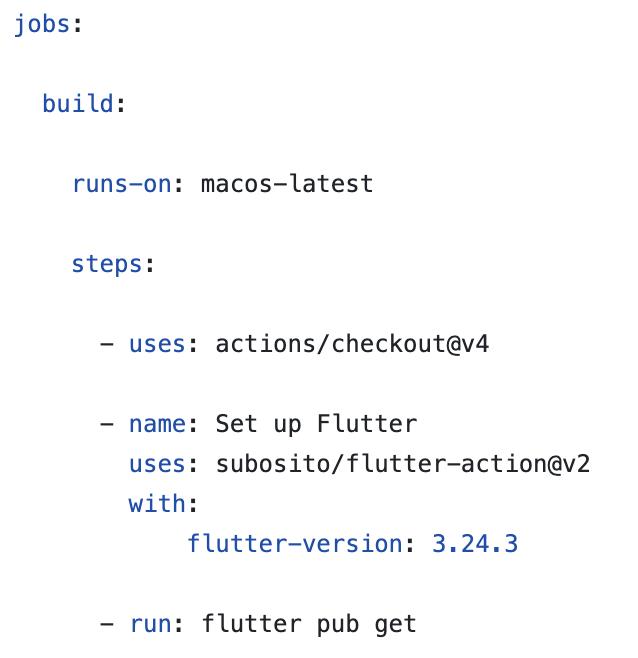
In this workflow, we have chosen to operate on macOS. The initial step involves checking out the repository code. Following this, we will establish the Flutter environment by specifying the version of Flutter we intend to use for compilation. To ensure all dependencies are defined in the pubspec.yaml file is accessible to our build runner; we execute the command ‘flutter pub get,’ which retrieves these dependencies seamlessly.
Building for iOS
Building a Flutter app for iOS includes a vital step known as code signing, which is essential for building and distributing apps on Apple devices. The choice of iOS signing profile used to sign the app will affect its behavior during this process.
- Development Profile – This profile is used to run the app on phones designated for development purposes. It is ideally utilized for testing the app at the developer’s desk.
- Ad Hoc Profile – This profile is used to sign the app for installation on specific phones. The UDID of each phone must be provided when the profile is created.
- App Store Connect Profile – This profile is used to sign the app for deployment through TestFlight and for production releases.
How to Create Provisioning Profiles
Procedure for Creating a Certificate Signing Request (CSR) and Setting Up Provisioning Profiles
1. Create a Certificate Signing Request (CSR): Start by creating a Certificate Signing Request following the steps outlined at this link:
- https://developer.apple.com/help/account/create-certificates/create-a-certificate-signing-request/
- https://developer.apple.com/account/resources/certificates/add
2. Create a Certificate: Next, create a certificate based on your intended usage—whether it’s for development or distribution. This can be done using the CSR generated in the previous step. For additional details, please refer to:
3. Register for the New App: Register the new application for which your Continuous Integration/Continuous Deployment (CI/CD) system has been set up. You can find the necessary information at:
4. Create a Provisioning Profile: Proceed to create a provisioning profile incorporating the certificate and the app ID generated from the steps. If the profile is intended for development, make sure to include the devices on which the IPA will be installed. Once everything is configured, download both the provisioning profile and the certificate.
5. Generate a .p12 File Finally, to generate a .p12 file from the downloaded certificate, follow these steps:
- Double-click the downloaded .cer file to add it to Keychain.
- Open Keychain Access, locate the certificate, right-click on it, and select “Export.”
- Choose the format as .p12 and set a strong password for the exported file, which can then be added as a secret in GitHub.
By following these steps, you will ensure that your application is effectively set up for signing and distribution and ready for a professional deployment.
Adding Secrets
We need to add four secrets to our GitHub repository for the iOS signing step to work
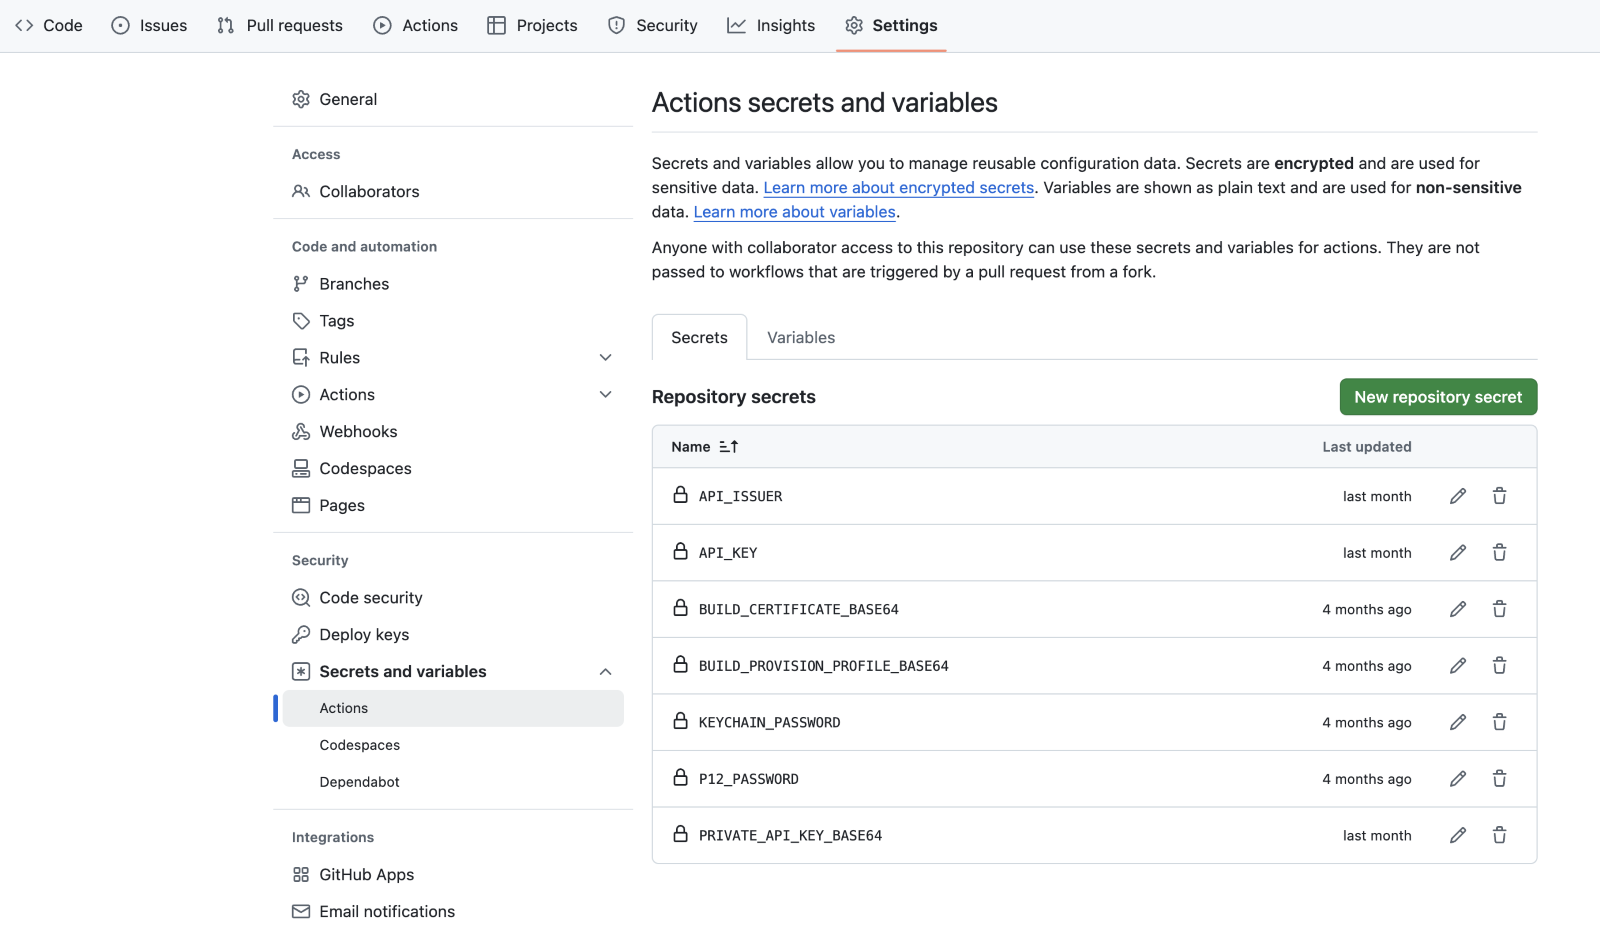
1. BUILD_CERTIFICATE_BASE64
This refers to the base64 representation of the exported p12 file from the previous step. You can effortlessly copy it to your clipboard using the following command:
bash base64 -i <build_certificate> | pbcopy
2. BUILD_PROVISION_PROFILE_BASE64
This is the base64 format of the provisioning profile that you downloaded in the prior step. Copy it to your clipboard using:
bash base64 -i <provision_profile> | pbcopy
3. KEYCHAIN_PASSWORD
A randomly generated password will be utilized for the Mac runner workflow.
4. P12_PASSWORD
The password is employed during the export of the p12 file after adding it to the keychain.
Once these secrets are established, we complete all prerequisites necessary for signing the Flutter application.
Setup for Signing
This pivotal step involves importing the Apple certificate and provisioning profile from the GitHub secrets, effectively installing them onto the runner.
Build and Export IPA
This critical phase consists of two essential operations: building the app and exporting the IPA post-signing.

Initially, this step builds the xarchive without any code signing.
![]()
Subsequently, we proceed to build the final IPA, which is ready for deployment to devices.
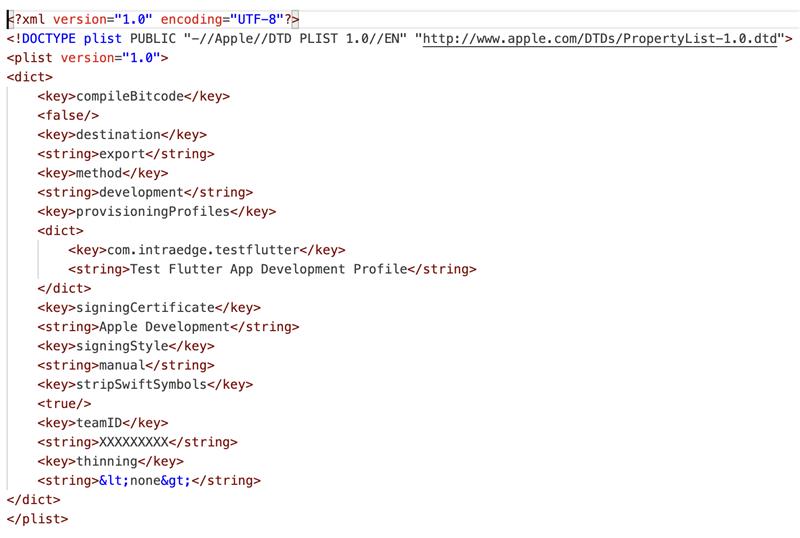
This utilizes the xarchive generated in the previous step and applies the signing process and rules specified in the ExportOptions.plist to produce the final IPA.
Sample format of ExportOptions.plist
Building for Android
Signing an Android application entails creating a keystore file with attributes essential for security and identification.
- Key store password
- Key alias
- Key password
https://developer.android.com/studio/publish/app-signing#generate-key
Follow the instructions in the link above to create a keystore. Once you’ve successfully created the keystore, it should be added as a secret to facilitate the signing of your Android app in the workflow.
You can accomplish this with the following command:
base64 –i <path_to_keystore> | pbcopy
To configure your GitHub secrets, please follow these steps:
- Create a GitHub secret called ‘KEYSTORE_BASE64’ and paste the copied content as its value.
- Add three additional secrets:
- ‘KEYSTORE_PASSWORD’
- ‘KEY_ALIAS’
- ‘KEY_PASSWORD’
Use the values that you specified during the creation of the keystore file.
The code provided will decode the base64-encoded keystore back to its original format. Following this, we will create a `key.properties` file, which contains the values required for the Android build process to sign the APK.
These commands will then generate the signed APK and app bundle, ready for internal testing and deployment to the Play Store.
Managing Environments
It is essential for any CI/CD system to incorporate an efficient method of managing builds across multiple environments. In a Flutter app, the ideal scenario is to generate a build each time a developer submits a pull request to the main branch, utilizing the development environment. Upon merging the pull request, a staging build can be generated from the main branch. Production builds, on the other hand, should be created as needed and can be triggered manually.
Defining an environment at build time can be achieved through various methods, with the simplest being the creation of a .env file during the build process. The application can then retrieve all environment-related information from this file.
This strategy not only establishes a .env for the staging environment but can also be adapted for other environments across different workflows, ensuring a streamlined and effective build management process.
Uploading to TestFlight for Internal Testing
TestFlight is an over-the-air (OTA) tool used to test and publish iOS apps. To automate the upload of builds generated through continuous integration and continuous delivery (CI/CD) to TestFlight, follow these steps:
- Set up a private key for communication with Apple servers.
- Validate the app to check for any warnings or errors.
- Upload the app to TestFlight.
The private key can be obtained from Apple’s developer portal by following specific steps. – https://developer.apple.com/help/account/manage-keys/create-a-private-key/
To effectively manage your app’s credentials, you can add secrets to your GitHub repository using Base64 encoding. Begin by generating the encoded version of your private key with the following command:
base64 -i <secret_key> | pbcopy
This command copies the encoded content to your clipboard, making it easy to paste later.
Next, it’s important to gather the necessary information. Along with your private key, you’ll need the `issuerId` and `KeyId`, both of which can be found in the same section as the private key.
Once you have these details, add the essential secrets to GitHub as follows:
- APPSTORE_API_PRIVATE_KEY: The Base64 encoded private key.
- APPSTORE_API_KEY_ID: The key identifier obtained from the developer portal.
- APPSTORE_ISSUER_ID: The issuer ID sourced from your developer profile.
With the secrets added, you’ll need to update your workflow to ensure the private key is accessible to your runners. Store the key in a designated folder, enabling the runner to easily retrieve it for execution.
Finally, integrate a step in your workflow to confirm the IPA file is valid and can be uploaded to TestFlight without any errors. By following these steps, you will expertly manage your app’s credentials and streamline your deployment process.

This step will be unsuccessful if the output binary contains errors or warnings. Upon successful execution, we will proceed to add a step to upload the binary to TestFlight for testing purposes.

Once this executes successfully, the test build will be available to test for internal testers which can be installed from the TestFlight app.
Production Deployment
Once testing concludes, we can establish a distinct pipeline to build and push the IPA for production. This process mirrors the previous workflow but requires the removal of ‘<key>testFlightInternalTestingOnly</key>’ from the ‘ExportOptions.plist.’
In conclusion, implementing CI/CD for Flutter projects significantly streamlines the development workflow, enhances code quality, and accelerates release cycles. By automating the building and deployment pipelines, teams can achieve consistent and reliable app delivery across various platforms. With the appropriate tools and setup, Flutter developers can concentrate more on crafting innovative features while reducing manual tasks and minimizing potential errors, ultimately enhancing the overall user experience.
Flutter, Google’s popular open-source framework, empowers developers to craft natively compiled applications across a multitude of platforms. Since its launch in 2017, Flutter has surged in popularity thanks to its rapid development cycle, captivating user interfaces, and impressive performance. By harnessing the Dart programming language and leveraging an extensive library of pre-designed widgets, developers can create stunning, responsive, and lightning-fast user interfaces that function seamlessly on iOS, Android, the web, and desktop environments.
For solo developers and larger teams alike, mastering Continuous Integration/Continuous Deployment (CI/CD) can significantly enhance your Flutter projects. In this blog post, we’ll delve into how Flutter developers can harness the power of GitHub Actions to automate their app’s entire lifecycle—from code commits to deployment—making the process smoother and more efficient.
GitHub Workflows and Triggers
A workflow is a highly customizable process that executes one or more jobs. These workflows are defined within a YAML file, stored alongside the original code in the same repository. Typically, YAML workflows are triggered by specific events or conditions specified in the file, but they also offer the flexibility for manual execution whenever needed.
In this example, we establish triggers designed to enhance our workflow efficiency:
- When a push occurs to the main branch
- When a pull request is submitted against the main branch
- The ‘workflow dispatch’ option allows this workflow to be executed manually from the actions tab in the repository whenever required.
Moreover, triggers can be configured to execute the entire workflow, proving invaluable for managing multiple environments within our development lifecycle—a topic we will explore further in this article.
Setting Up Code and Flutter Environment
The first part includes setting up the code base and choosing a runner.
In this workflow, we have chosen to operate on macOS. The initial step involves checking out the repository code. Following this, we will establish the Flutter environment by specifying the version of Flutter we intend to use for compilation. To ensure all dependencies are defined in the pubspec.yaml file is accessible to our build runner; we execute the command ‘flutter pub get,’ which retrieves these dependencies seamlessly.
Building for iOS
Building a Flutter app for iOS includes a vital step known as code signing, which is essential for building and distributing apps on Apple devices. The choice of iOS signing profile used to sign the app will affect its behavior during this process.
- Development Profile – This profile is used to run the app on phones designated for development purposes. It is ideally utilized for testing the app at the developer’s desk.
- Ad Hoc Profile – This profile is used to sign the app for installation on specific phones. The UDID of each phone must be provided when the profile is created.
- App Store Connect Profile – This profile is used to sign the app for deployment through TestFlight and for production releases.
How to Create Provisioning Profiles
Procedure for Creating a Certificate Signing Request (CSR) and Setting Up Provisioning Profiles
1. Create a Certificate Signing Request (CSR): Start by creating a Certificate Signing Request following the steps outlined at this link:
- https://developer.apple.com/help/account/create-certificates/create-a-certificate-signing-request/
- https://developer.apple.com/account/resources/certificates/add
2. Create a Certificate: Next, create a certificate based on your intended usage—whether it’s for development or distribution. This can be done using the CSR generated in the previous step. For additional details, please refer to:
3. Register for the New App: Register the new application for which your Continuous Integration/Continuous Deployment (CI/CD) system has been set up. You can find the necessary information at:
4. Create a Provisioning Profile: Proceed to create a provisioning profile incorporating the certificate and the app ID generated from the steps. If the profile is intended for development, make sure to include the devices on which the IPA will be installed. Once everything is configured, download both the provisioning profile and the certificate.
5. Generate a .p12 File Finally, to generate a .p12 file from the downloaded certificate, follow these steps:
- Double-click the downloaded .cer file to add it to Keychain.
- Open Keychain Access, locate the certificate, right-click on it, and select “Export.”
- Choose the format as .p12 and set a strong password for the exported file, which can then be added as a secret in GitHub.
By following these steps, you will ensure that your application is effectively set up for signing and distribution and ready for a professional deployment.
Adding Secrets
We need to add four secrets to our GitHub repository for the iOS signing step to work
1. BUILD_CERTIFICATE_BASE64
This refers to the base64 representation of the exported p12 file from the previous step. You can effortlessly copy it to your clipboard using the following command:
bash base64 -i <build_certificate> | pbcopy
2. BUILD_PROVISION_PROFILE_BASE64
This is the base64 format of the provisioning profile that you downloaded in the prior step. Copy it to your clipboard using:
bash base64 -i <provision_profile> | pbcopy
3. KEYCHAIN_PASSWORD
A randomly generated password will be utilized for the Mac runner workflow.
4. P12_PASSWORD
The password is employed during the export of the p12 file after adding it to the keychain.
Once these secrets are established, we complete all prerequisites necessary for signing the Flutter application.
Setup for Signing
This pivotal step involves importing the Apple certificate and provisioning profile from the GitHub secrets, effectively installing them onto the runner.
Build and Export IPA
This critical phase consists of two essential operations: building the app and exporting the IPA post-signing.
Initially, this step builds the xarchive without any code signing.
![]()
Subsequently, we proceed to build the final IPA, which is ready for deployment to devices.
This utilizes the xarchive generated in the previous step and applies the signing process and rules specified in the ExportOptions.plist to produce the final IPA.
Sample format of ExportOptions.plist
Building for Android
Signing an Android application entails creating a keystore file with attributes essential for security and identification.
- Key store password
- Key alias
- Key password
https://developer.android.com/studio/publish/app-signing#generate-key
Follow the instructions in the link above to create a keystore. Once you’ve successfully created the keystore, it should be added as a secret to facilitate the signing of your Android app in the workflow.
You can accomplish this with the following command:
base64 –i <path_to_keystore> | pbcopy
To configure your GitHub secrets, please follow these steps:
- Create a GitHub secret called ‘KEYSTORE_BASE64’ and paste the copied content as its value.
- Add three additional secrets:
- ‘KEYSTORE_PASSWORD’
- ‘KEY_ALIAS’
- ‘KEY_PASSWORD’
Use the values that you specified during the creation of the keystore file.
The code provided will decode the base64-encoded keystore back to its original format. Following this, we will create a `key.properties` file, which contains the values required for the Android build process to sign the APK.
These commands will then generate the signed APK and app bundle, ready for internal testing and deployment to the Play Store.
Managing Environments
It is essential for any CI/CD system to incorporate an efficient method of managing builds across multiple environments. In a Flutter app, the ideal scenario is to generate a build each time a developer submits a pull request to the main branch, utilizing the development environment. Upon merging the pull request, a staging build can be generated from the main branch. Production builds, on the other hand, should be created as needed and can be triggered manually.
Defining an environment at build time can be achieved through various methods, with the simplest being the creation of a .env file during the build process. The application can then retrieve all environment-related information from this file.
This strategy not only establishes a .env for the staging environment but can also be adapted for other environments across different workflows, ensuring a streamlined and effective build management process.
Uploading to TestFlight for Internal Testing
TestFlight is an over-the-air (OTA) tool used to test and publish iOS apps. To automate the upload of builds generated through continuous integration and continuous delivery (CI/CD) to TestFlight, follow these steps:
- Set up a private key for communication with Apple servers.
- Validate the app to check for any warnings or errors.
- Upload the app to TestFlight.
The private key can be obtained from Apple’s developer portal by following specific steps. – https://developer.apple.com/help/account/manage-keys/create-a-private-key/
To effectively manage your app’s credentials, you can add secrets to your GitHub repository using Base64 encoding. Begin by generating the encoded version of your private key with the following command:
base64 -i <secret_key> | pbcopy
This command copies the encoded content to your clipboard, making it easy to paste later.
Next, it’s important to gather the necessary information. Along with your private key, you’ll need the `issuerId` and `KeyId`, both of which can be found in the same section as the private key.
Once you have these details, add the essential secrets to GitHub as follows:
- APPSTORE_API_PRIVATE_KEY: The Base64 encoded private key.
- APPSTORE_API_KEY_ID: The key identifier obtained from the developer portal.
- APPSTORE_ISSUER_ID: The issuer ID sourced from your developer profile.
With the secrets added, you’ll need to update your workflow to ensure the private key is accessible to your runners. Store the key in a designated folder, enabling the runner to easily retrieve it for execution.
Finally, integrate a step in your workflow to confirm the IPA file is valid and can be uploaded to TestFlight without any errors. By following these steps, you will expertly manage your app’s credentials and streamline your deployment process.
This step will be unsuccessful if the output binary contains errors or warnings. Upon successful execution, we will proceed to add a step to upload the binary to TestFlight for testing purposes.
Once this executes successfully, the test build will be available to test for internal testers which can be installed from the TestFlight app.
Production Deployment
Once testing concludes, we can establish a distinct pipeline to build and push the IPA for production. This process mirrors the previous workflow but requires the removal of ‘<key>testFlightInternalTestingOnly</key>’ from the ‘ExportOptions.plist.’
In conclusion, implementing CI/CD for Flutter projects significantly streamlines the development workflow, enhances code quality, and accelerates release cycles. By automating the building and deployment pipelines, teams can achieve consistent and reliable app delivery across various platforms. With the appropriate tools and setup, Flutter developers can concentrate more on crafting innovative features while reducing manual tasks and minimizing potential errors, ultimately enhancing the overall user experience.
